
Ahhh. I’m sorry to have missed you all. If you didn’t know, it’s because last week, in lieu of a Battle Report, I started a Malifaux Podcast with some of the other guys from Midwest Wargaming.
In addition to this, I hadn’t played a game outside of the Pumpkin Spice & Soulstones Tournament and a pair of games ‘quick-played’ in preparation for the tournament. You’ll be happy to know I finished 5th out of 8 players after going 1-1-1, thanks to a combination of some questionable list-building and the coldest fate decks in my Malifaux experience.
BUT! We are back! Here in the Twin Cities Malifaux community, we’ve begun a Shifting Loyalties campaign, coinciding with the global Malifaux event Divergent Paths! My first opponent is a local guy who, because he has an infant (whom he loves?), is unable to come out to the stores. So I faced him in his lovely home in the suburbs, in a showdown which combined both the Campaign and the Divergent Paths event, as we battled over a wayward child who just came to Malifaux and was being hunted by Witchling Stalkers.
My list for week one of the Campaign:
Parker Barrows
– Highwayman
Doc Mitchell
Bandido
Bandido
Bandido
Mad Dog Brackett
Johan
Sue
Big Jake
+3 scrip
The Campaign has slightly different listbuilding rules, limiting me to only one faction upgrade paid for by soulstones in my first list. Up to 3 soulstones can be left for your ‘scrip’ bank.
My opponent’s list:
Jakob Lynch (free)
-The Rising Son (2, single faction upgrade)
Hungering Darkness (0)
The Illuminated x2 (14)
Mr. Graves (8)
Mr. Tannen (6)
Monk of High River x2 (12)
Ten Thunder Brother (5)
3ss left for scrip
He had also already played a game, so some of his Crew were already wounded, because they had been taken out the game before. Mr. Graves was unable to use the ‘Focus’ action. One of the Monks of High River was unable to charge. The other Monk was automatically killed permanently if he was taken out again.
The Scenario is a unique one. In the center of the board is a 30mm marker, representing the child. On the edges of the board along the centerline are 2 pairs of Witchling Stalkers, who will do nothing but Move-Move towards the child marker. VPs are scored for killing the Stalkers, and also for having the child marker within 6″ of your deployment zone.
There’s also a statute marker that needs to be placed near the center. If a character is within 2″ of the statute, they get +2 to Casts. If the character kills somebody whilst standing within 2″ of the statute, they earn the crew 2 extra scrip! This is the weekly event for our campaign.
Scheme pool: Convict Labor, Public Demonstration, Inspection, Show of Force, Leave Your Mark.
Obviously, in this format you can’t take Show of Force, as there are no upgrades on anybody except the Masters, so it’s impossible to score points. I go with Convict Labor and Leave Your Mark, figuring I’ll be able to put scheme markers down/converted into my own.
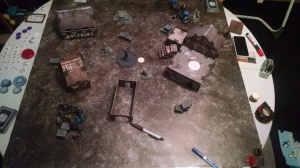
Corner deployment, a scenario requirement, leaves us with a board looking like so:
“Alright, y’all, listen up.” Parker looked around at his gang. “This here Casino’s the sort that isn’t going to call for the Guild when they get robbed, so let’s get in, get out, and get rich.”
“Hey. What’s that kid doing here? You didn’t say anythin’ ’bout no kids.” Johan, the big Miner who only worked with Parker sometimes spoke up.
“You care about that kid so much, you better get him out of here yourself.” Mad Dog Brackett puffed around his cigar.
“Jesus, Christ.” Doc Mitchell shook his head, once again ruing his role in this entire affair.
Turn One
Sue, Mad Dog Brackett, and Doc Mitchell head towards the middle, to put a threat down in case anybody is thinking of moving the Child marker. Johan and Big Jake take shelter in the small building along the center to protect themselves from any shooting or ranged shenanigans from the Lynch crew. In the middle, they’re met by opposition from Messeurs Graves and Tannen, as well as the two Illuminated. Jakob Lynch lags behind, while the Ten Thunders Brother makes a beeline for the child, interacting with it and moving it back towards Lynch and his deployment zone.
On the right wing, Parker and a Bandido square off with Hungering Darkness and one of the High River Monks. On the left, Two Bandidos flank the center position, while another High River Monk makes his way towards the corner.
“Damn! That ninja took the kid!” Johan cursed, peering out through the doorway.
“It’s alright,” Big Jake drawled, “kid ain’t got no money.”
“GUILD!” One of the bandits shouts.
“Shoot ’em, dummy. I ain’t going back to prison!” Sue ordered, opening fire with his pistols.
Turn Two
Mr. Graves and Mr. Tannen pummel their side’s Witchling Stalkers, and the Bandidos on that side are nice enough to soften one of them up for the two enough that Lynch’s crew is able to kill one of them to score another point.
On the other flank, Huggy commands Parker to walk backwards, after moving forward himself. Parker then uses the 0 action from his card to have a Bandido shoot Hungering Darkness after shooting Lynch’s totem once himself, and a red joker on the damage flip from the Bandido is enough to send Hungering Darkness back to where he came from.
In the middle, the Ten Thunders Brother is gunned down, but the Illuminated march steadfastly forwards, entering battle with Sue, Mad Dog, and Johan while Big Jake hangs back and chucks a tomahawk. Jakob Lynch begins walking the kid back towards his deployment zone, while also casting a spell that gets Mad Dog Brackett addicted to Brilliance.
At the end of the turn, Martin reveals Public Demonstration as a scheme, scoring maximum points as his Illuminated are all within range of Johan, Sue, and Big Jake. He also scores the strategy, bringing his total VP to 5. 0 – 5 Ten Thunders.
“Y’all shut up. More Guild are going to come you keep hollerin’ like that!” The drug addicts were shouting something, but Brackett just leveled his shotgun at them and kept on firin’.
Turn 3
Parker guns down a High River Monk as it rushes for the corner, ending Martin’s chance to score Investigation. The he and his ‘obeyed’ Bandido friend finish off the two Witchling Stalkers, giving me my first VP for this game.
Then, one of the Illuminated crosses the center line to charge Mad Dog Brackett, taking him out due to his addiction to Brilliance. However, Mad Dog is more than 6″ away from Lynch, so Hungering Darkness does NOT return upon Mad Dog’s death. Mad Dog flips an injury. Sue is also put in trouble, but Doc Mitchell is able to patch him up and give him Hard to Wound 2 in addition to already having Hard to Kill – the Man in Black’s not going anywhere!
On the left flank, the two Bandidos square off with Mr. Graves and Mr. Tannen, hitting Mr. Graves to trigger his black blood onto his buddy.
Seeing Parker finally fight his way free on the flank, Jakob Lynch decides this is an excellent time to prove that discretion is the better part of valor as he starts walking the child marker back all the way into his deployment zone. I certainly won’t be scoring any points off the strategy.
Most importantly, I prove very stupid, after I thought I was doing something clever. Big Jake had dropped a scheme marker for Convict Labor, while Parker had used some scheme markers dropped by the Witchling Stalkers to convert into his own. Only problem is, all three scheme markers are within 2″ of each other. Hell – two of them are stacked one on top of another! No Convict Labor for me. And on the right flank, the Bandido’s marker dropped to score Leave Your Mark is too close to score for that scenario, but will be fine for Convict Labor going forward. 2-6 Ten Thunders.
“You big dumb idiot, get out of my way!” Parker snarled, as Big Jake bumped into him. “Lynch is the one with all the money! They’re getting away. Shoot every last one of them – they’re easier to rob when they’re dead!”
Turn 4
The Bandidos on the left flank are able to take down Mr. Graves, simultaneously leaving a very injured Mr. Tannen. Graves flips an injury, so he’ll be one away from perma-death in the near future. Both Bandidos are forced to off themselves by Mr. Tannen, but only one flips an injury. The killing of Mr. Graves earns me 2 scrip, as the responsible Bandido is right up against the statue.
In the middle, Johan is taken out by an Illuminated, but does not flip an injury and DOES finish the Job, dropping a scheme marker. Sue then takes out one of the Illuminated, dealing an injury and earning an additional 2 scrip for the crew. Parker dashes into the middle of the map after cleaning up the pile of scheme markers ruining my plans. The remaining Bandido heads up and scores Leave My Mark.
Martin and Jakob Lynch score the child marker as they move deeper into perceived safety. 3-8 Ten Thunders.
“Damn. Make sure you go through all these guys’ pockets!”
Turn 5
Mr. Tannen goes down to Parker Barrows, but isn’t injured. Parker then drops the remaining scheme marker needed to score Convict Labor. The remaining High River Monk and the Illuminated fall under the combined assaults of Big Jake and Sue. 6 more scrip for killing things while standing right by the statue.
Lynch runs away further, taking the kid with him. On the right flank, the remaining Bandido moves forward and scores Leave My Mark one more time. 5-9 Ten Thunders.
The flip to end the game . . . adds one more turn! This is relevant, as I’ll be able to score two more VP, adding a scrip to my haul for the game.
“Make sure you get whatever money those guys had. I’ll get Lynch.”
Turn Six
Parker wins initiative, activates first, and kills Jakob Lynch. The Child is too far away to move at all, so I won’t be able to move him back even to the middle, let alone my own deployment zone. Lynch isn’t injured. Cheating the injury flip, Martin avoids an injury to Hungering Darkness, as well. 7-10 Ten Thunders Win!
“Take that, ya bastard.” Parker stared down the barrel of his smoking gun. “Alright, boys. What’d we get?”
So, after the game, I walk away adding 14 scrip to my pool despite losing, which is . . . 2 short of the maximum for the week. That’s great.
Flipping for wounds: Mad Dog Brackett is now ‘Wanted.’ The injured Bandido has “Wanders off” and gets pushed by my opponent at the start of the game.
For week 2, I start with 17 scrip. My first new model costs 5 soulstones less to hire, so I hire Hans – figuring he’ll be particularly brutal with a limited number of upgrades – for 3 soulstones. I also select a Bounty for 4 soul stones. Then I spend 8 soulstones on 4 upgrades (upgrades cost double their soulstone cost in scrip): Stick Up, Hail of Bullets, Lucky Poncho, and 1 Oathkeeper.
I’m not going to get a game of Malifaux in during Week 2 of the campaign, sadly, as the event would let me use the Horsemen models I just finished constructing. But I’ll be able to hire a new model. I’m thinking a Dead Outlaw, but if you can think of a 7SS model I should hire instead, let me know!

Leave a comment